この記事はだいたい 4 分ほどで読めます。
VirtualBox で CentOS7 にOracleをインストールしようとしたら空き領域不足でエラーとなってしまいました。
領域を確保するためにディスクの拡張をしました。
目次
環境
実行した環境はこちらです。
- クライアントPC: Windows10
- VirtualBox : Version 6.1.6 Edition
- CentOS7 : CentOS Linux release 7.8.2003 (Core)
実施前のディスクの状態
実施前の状態を確認します。
[oracle@centos tmp]$ df -h
ファイルシス            サイズ  使用  残り 使用% マウント位置
devtmpfs                  896M     0  896M    0% /dev
tmpfs                     907M     0  907M    0% /dev/shm
tmpfs                     907M  8.6M  899M    1% /run
tmpfs                     907M     0  907M    0% /sys/fs/cgroup
/dev/mapper/centos-root    14G  9.5G  4.0G   71% /
/dev/sda1                1014M  193M  822M   20% /boot
tmpfs                     182M     0  182M    0% /run/user/1000
空き領域が4GBしかありません。
インストールしようとしたOracle12cは8GBの空き領域が必要なので10GB以上を目指します。
一旦、実行中の VirtualBox を停止して VirtualBoxマネージャー を操作します。
VirtualBox 操作
VirtualBox のHDDを拡張していきます。
Oracle VM VirtualBox マネージャーを開きます。
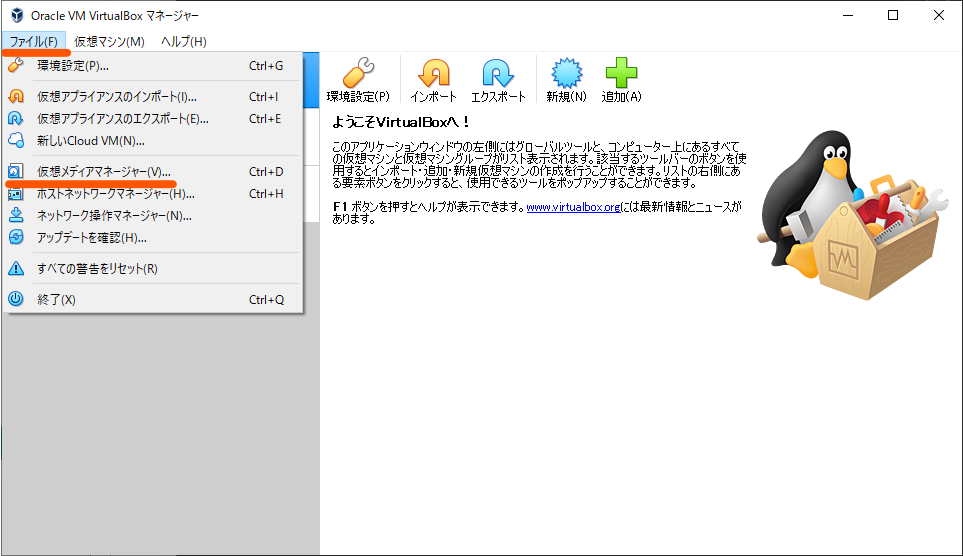
[ファイル]-[仮想メディアマネージャー]をクリック。
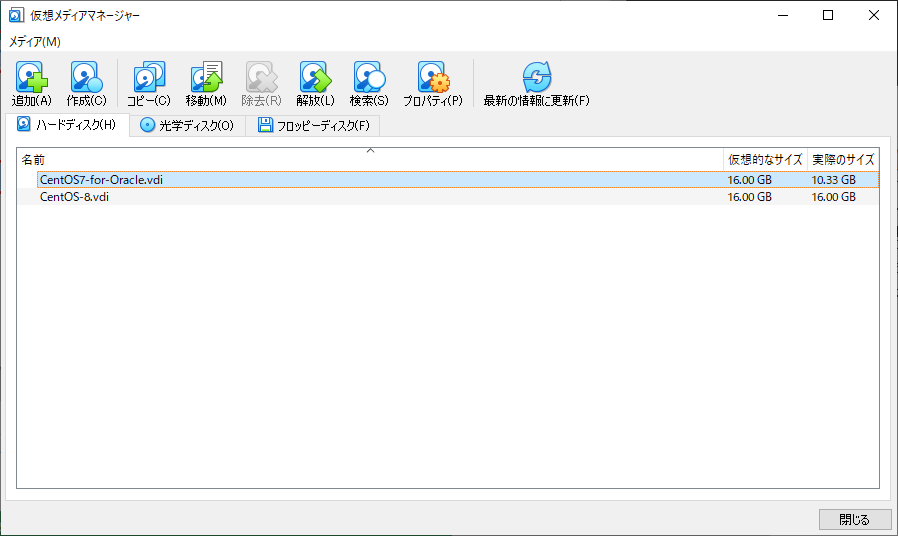
仮想的なサイズで容量が確認できます。
該当のハードディスクをダブルクリック。
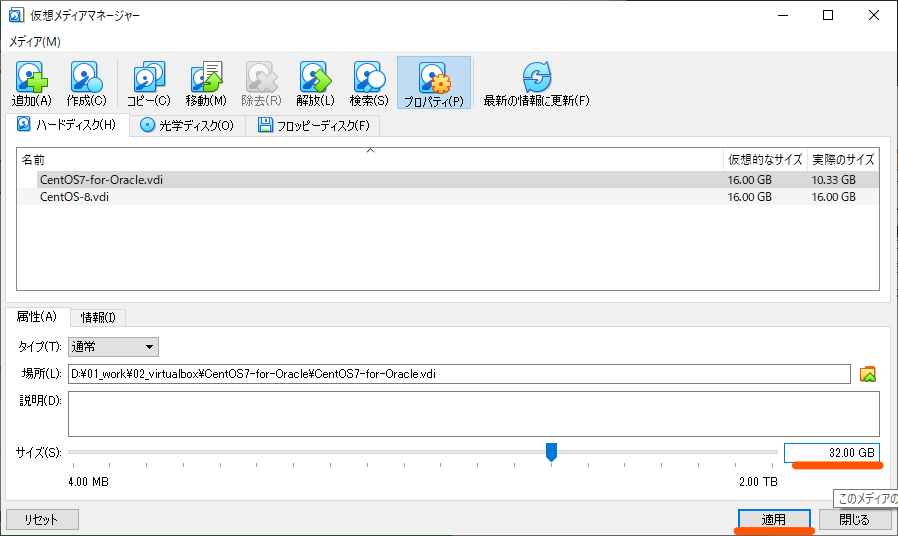
とりあえず倍の32GBにします。
サイズを入力して[適用]をクリック。
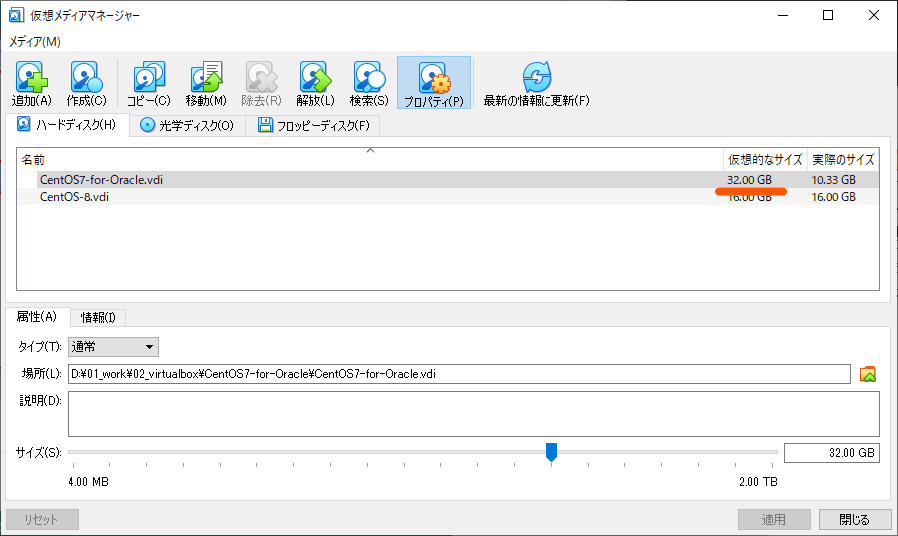
32GBに変更されました。
VirtualBox の操作は完了です。
続いて VirtualBox のOSを起動して変更していきます。
CentOS7の操作
パーティション
fdisk でパーティションを拡張します。
[root@centos ~]# fdisk /dev/sda
Welcome to fdisk (util-linux 2.23.2).

Changes will remain in memory only, until you decide to write them.
Be careful before using the write command.


コマンド (m でヘルプ): p

Disk /dev/sda: 34.4 GB, 34359738368 bytes, 67108864 sectors
Units = sectors of 1 * 512 = 512 bytes
Sector size (logical/physical): 512 bytes / 512 bytes
I/O サイズ (最小 / 推奨): 512 バイト / 512 バイト
Disk label type: dos
ディスク識別子: 0x000affd5

デバイス ブート      始点        終点     ブロック   Id  システム
/dev/sda1   *        2048     2099199     1048576   83  Linux
/dev/sda2         2099200    33554431    15727616   8e  Linux LVM

※いったんパーティション2を削除
コマンド (m でヘルプ): d
パーティション番号 (1,2, default 2): 2
Partition 2 is deleted

※パーティション2を追加
コマンド (m でヘルプ): n
※そのままEnter
Partition type:
p   primary (1 primary, 0 extended, 3 free)
e   extended

※そのままEnter
Select (default p): p

※そのままEnter
パーティション番号 (2-4, default 2):

※そのままEnter
最初 sector (2099200-67108863, 初期値 2099200):
初期値 2099200 を使います

※そのままEnter
Last sector, +sectors or +size{K,M,G} (2099200-67108863, 初期値 67108863):
初期値 67108863 を使います
Partition 2 of type Linux and of size 31 GiB is set

※書き込み
コマンド (m でヘルプ): w
パーティションテーブルは変更されました!

ioctl() を呼び出してパーティションテーブルを再読込みします。

WARNING: Re-reading the partition table failed with error 16: デバイスもしくはリソースがビジー状態です.
The kernel still uses the old table. The new table will be used at
the next reboot or after you run partprobe(8) or kpartx(8)
ディスクを同期しています。
一旦リブートする。
[root@centos ~]# reboot
LVM
次にLVMを拡張します。
[root@centos ~]# pvresize /dev/sda2
[root@centos ~]# lvextend -l +100%FREE /dev/centos/root
[root@centos ~]# xfs_growfs /dev/centos/root
完了しました。
確認
ディスクの状態を確認してみます。
[root@centos ~]# df -h
ファイルシス            サイズ  使用  残り 使用% マウント位置
devtmpfs                  896M     0  896M    0% /dev
tmpfs                     907M     0  907M    0% /dev/shm
tmpfs                     907M  8.7M  899M    1% /run
tmpfs                     907M     0  907M    0% /sys/fs/cgroup
/dev/mapper/centos-root    30G  9.5G   20G   33% /
/dev/sda1                1014M  193M  822M   20% /boot
tmpfs                     182M     0  182M    0% /run/user/0
tmpfs                     182M     0  182M    0% /run/user/1000
空き領域が20GBになりました。
まとめ
ディスクの拡張を行いました。
うまいこといきました。
最後まで読んでいただきありがとうございます。読んだついでに「いいね!」をよろしくお願いします。
おわり。








大変参考になりました。
自分の環境には2つファイルシステムがあり、
/dev/mapper/cl-root /
/dev/mapper/cl-home /home
LVM拡張操作(lvextendなど)をどちらに施すか悩んでいましたが、
cl-homeの方にだけ行えば良いことが分かりました。