この記事はだいたい 6 分ほどで読めます。
このBlogを書き始めて1か月たったのでドメインを有料のものに変更しました。
その設定変更した内容を備忘録として残します。

目次
ドメイン変更手順
- ドメイン取得
- サーバー(CentOS7)の設定変更
- サイト移転
bind設定変更
私の場合は非固定IPで動かしているので内部向けの設定を変更していきます。
バージョン情報
設定変更するサーバーのバージョン情報です。
# cat /etc/redhat-release
CentOS Linux release 7.8.2003 (Core)
bind設定ファイル
named.confを修正します。
旧ドメイン名で設定されているので新ドメインに変更します。
# vi /var/named/chroot/etc/named.conf
named.confを開いて下記を変更。
        // ドメイン名変更
        // include "/etc/named/named.beanhouse.dip.jp.zone";
        include "/etc/named/named.beanhouse.org.zone";
内部向けゾーン定義ファイル
新ドメイン用の内部向けゾーン定義ファイルを新規作成します。
# vi /etc/named/named.beanhouse.org.zone
zone "beanhouse.org" {
        type master;
        file "beanhouse.org.db";
};
zone "1.168.192.in-addr.arpa" {
        type master;
        file "1.168.192.in-addr.arpa.db";
};
内部向け正引きゾーンファイル
新ドメイン用の内部向け正引きゾーンファイルを新規作成します。
# vi /var/named/beanhouse.org.db
$TTL    86400
@       IN      SOA     beanhouse.org.  root.beanhouse.org.(
                                      2011062001 ; Serial
                                      28800      ; Refresh
                                      14400      ; Retry
                                      3600000    ; Expire
                                      86400 )    ; Minimum
        IN NS    beanhouse.org.
        IN MX 10 beanhouse.org.
@       IN A     192.168.1.100
*       IN A     192.168.1.100
内部向け逆引きゾーンファイル
逆引きゾーンファイルは旧ドメインを新ドメインに修正。
# vi /var/named/1.168.192.in-addr.arpa.db
              IN      NS    beanhouse.dip.jp.
100           IN      PTR   beanhouse.dip.jp.
↓↓↓↓↓↓↓↓↓↓↓↓↓↓↓↓↓↓↓↓↓↓↓↓↓↓↓↓↓↓↓↓↓↓↓↓↓↓↓↓↓↓
              IN      NS    beanhouse.org.
100           IN      PTR   beanhouse.org.
bind再起動
# systemctl restart named-chroot
動作確認
コマンドプロンプトを開いてnslookupを使用して正引きと逆引きの確認をします。
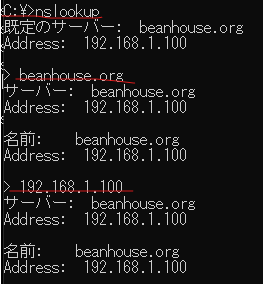
正引き逆引きともに確認が取れました。
以上でbindの設定変更は完了。
続いてhttpdの設定を変更します。
httpd 設定変更
httpdの設定変更はサーバーの設定変更に該当します。
旧ドメインを生かしつつ新ドメインでもアクセスができるように設定を行っていきます。
httpd本体の設定は新ドメインとし、旧ドメインはVirtualHostとして新たに設定します。
httpd 設定ファイル
ServerNameを新ドメインに変更。
# vi /etc/httpd/conf/httpd.conf

#ServerName examole.dip.jp:80
ServerName examole.org:80
サーバー証明書
新ドメイン用のサーバー証明書を取得。
# certbot –expand -d examole.org
ApacheのSSL設定ファイル修正
# vi /etc/httpd/conf.d/ssl.conf
#SSLCertificateFile /etc/letsencrypt/live/example.dip.jp/cert.pem
SSLCertificateFile /etc/letsencrypt/live/example.org/cert.pem

#SSLCertificateKeyFile /etc/letsencrypt/live/example.dip.jp/privkey.pem
SSLCertificateKeyFile /etc/letsencrypt/live/example.org/privkey.pem

#SSLCertificateChainFile /etc/letsencrypt/live/example.dip.jp/chain.pem
SSLCertificateChainFile /etc/letsencrypt/live/example.org/chain.pem
バーチャルホスト設定
旧ドメインをバーチャルホストとして設定し、アクセスしたときに新ドメインにリダイレクトをする。
# vi /etc/httpd/conf.d/virtualhost-example.dip.jp.conf
<VirtualHost *:80>
    ServerName example.dip.jp
    RewriteEngine on
    RewriteRule ^(.\*)https://example.org/$1 [R=301,L]
    ErrorLog logs/example.dip.jp-error_log
    CustomLog logs/example.dip.jp-access_log combined env=!no_log
</VirtualHost>
SSL対応。
# vi virtualhost-example.dip.jp-le-ssl.conf
<IfModule mod_ssl.c>
    <VirtualHost *:443>
        ServerName example.dip.jp

        #この書き方だとchromeがうまいことリダイレクトしてくれない
        #RewriteEngine on
        #RewriteRule ^(.*)https://example.org/$1  [R=301,L]

        #firefox chromeともにOK
        Redirect permanent / https://example.org/

        ErrorLog logs/example.dip.jp-error_log
        CustomLog logs/example.dip.jp-access_log combined env=!no_log
        ServerAlias example.org
        Include /etc/letsencrypt/options-ssl-apache.conf
        #ドメイン変更前の証明書を使用する
        SSLCertificateFile /etc/letsencrypt/live/example.dip.jp/cert.pem
        SSLCertificateKeyFile /etc/letsencrypt/live/example.dip.jp/privkey.pem
        SSLCertificateChainFile /etc/letsencrypt/live/example.dip.jp/chain.pem
    </VirtualHost>
</IfModule>
RewriteRule ^(.*)https://example.org/$1 [R=301,L] と記述して動かしてたらfirefoxではちゃんと動いてる感じだったんだけど、chromeで動いてませんでした。
それに気づかないでサイト移転で相当手こずりました。
httpd再起動
# systemctl reload httpd
動作確認
まずは新ドメインでアクセスできるか確認。

アクセスできました。
続いてリダイレクトの確認。
古いurlで検索して新しいurlで表示されればOK。
HTTP応答ステータスコードも301になってるか確認。
firefox
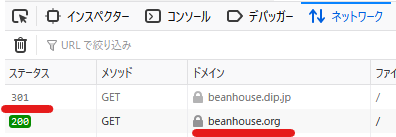
古いurlを入力して、新しいurlにリダイレクトされました。
ステータスコードも301で応答してます
chrome
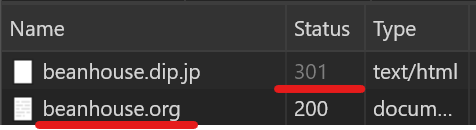
古いurlを入力して、新しいurlにリダイレクトされました。
ステータスコードも301で応答してます
とりあえず動作確認は完了です。
サイト移転
Google Search Consoleのアドレス変更ツールを使ってGoogle検索の結果を移行します。
サイトのナビゲーション通りに操作します。
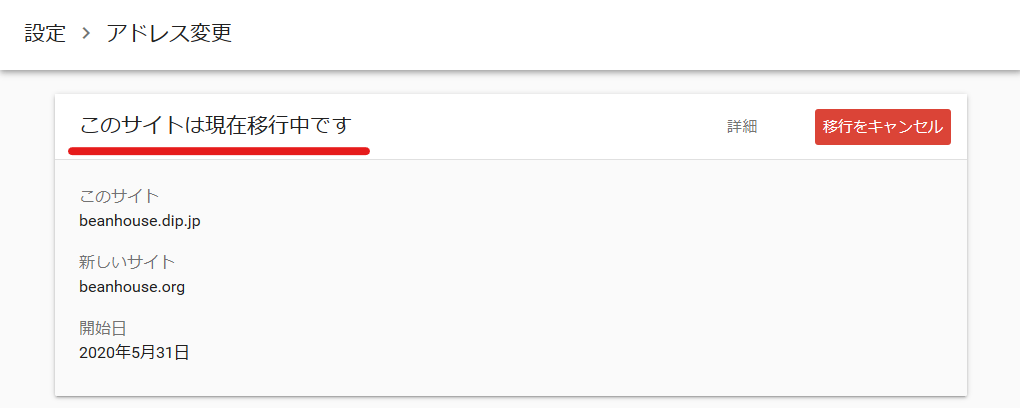
移行中になりました。
まとめ
あらかじめ設定内容を確認して変更点の洗い出しを行うことが必要ですね。
私の場合はリダイレクトの設定がうまくいかずに2日くらい旧urlからの接続ができない状態になってしまいました。
ほんと最悪でした。
とりあえず今はちゃんと表示もされるしサイト移転もできたしめでたしめでたしって感じかな。
おわり。